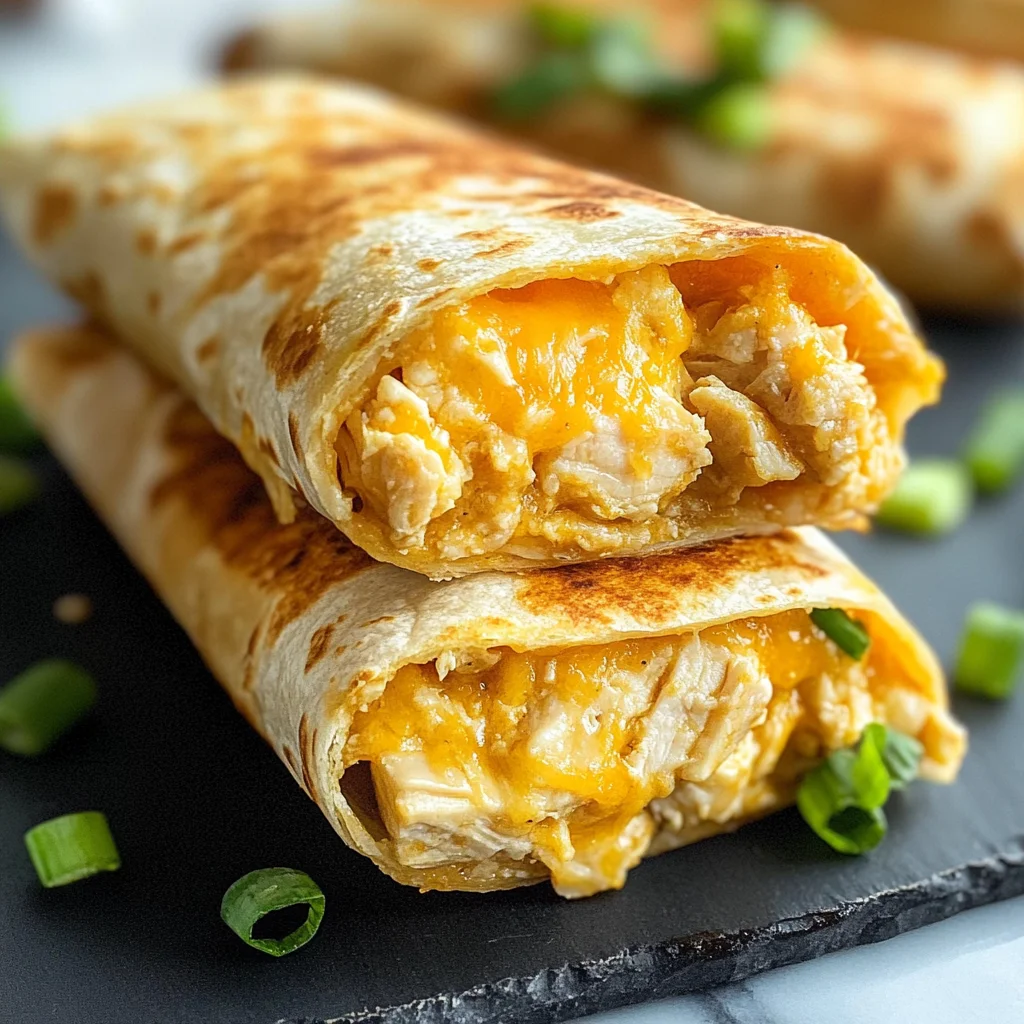
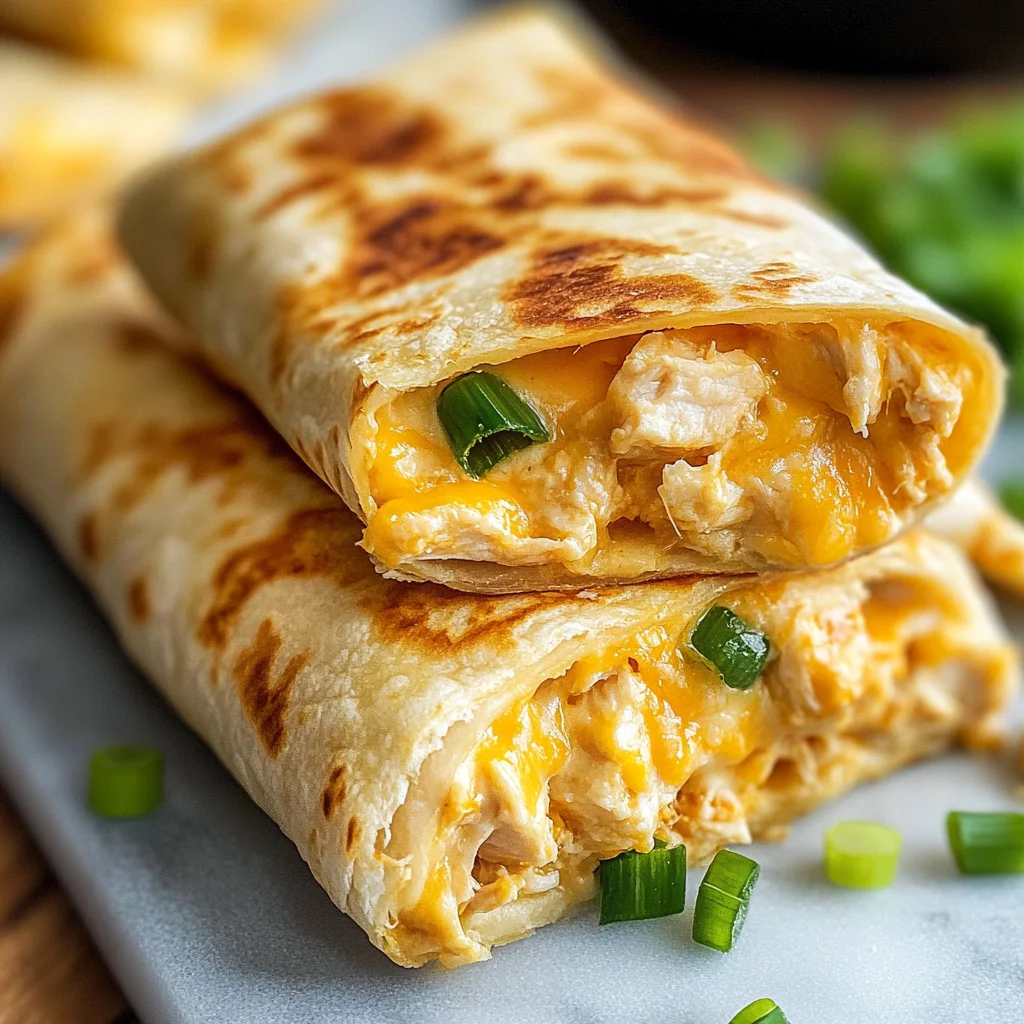
Cheesy Garlic Chicken Wraps
Cheesy Garlic Chicken Wraps are a delightful dish that combines crispy tortillas with a gooey, garlicky filling. These wraps are not only easy to prepare but also packed with protein, making them perfect for lunch or dinner. Whether you’re hosting a casual gathering or enjoying a quiet night in, these wraps will surely impress.
Why You’ll Love This Recipe
- Quick and Easy: Ready in just 22 minutes, these wraps fit perfectly into any busy schedule.
- Flavor-Packed: The combination of garlic, cheese, and chicken creates an irresistible taste that keeps you coming back for more.
- High-Protein Meal: With 38 grams of protein per serving, these wraps will keep you satisfied throughout the day.
- Versatile Options: Customize the fillings based on your preferences or what you have on hand for a personal touch.
- Perfect for Any Occasion: Whether it’s a casual lunch, an easy dinner, or a party snack, these wraps are always a hit.
Tools and Preparation
Before diving into this delicious recipe, gather your tools to ensure a smooth cooking experience.
Essential Tools and Equipment
- Non-stick pan
- Mixing bowl
- Knife
- Cutting board
- Measuring spoons
- Spatula
Importance of Each Tool
- Non-stick pan: This is essential for achieving that golden-crisp exterior without sticking to the surface.
- Mixing bowl: A sturdy bowl makes it easy to combine ingredients for your wrap filling without spilling.
- Knife: A sharp knife ensures precise chopping of ingredients like green onions and garlic.
Ingredients
For the Wraps
- 2 large tortillas (regular or low-carb/high-protein)
- 7 oz cooked chicken (about 200 grams, chopped; rotisserie is great)
- 2 garlic cloves (minced or grated; adjust to taste)
- 2 tablespoons light mayonnaise
- 1 tablespoon light Greek yogurt (or plain yogurt)
- 2 teaspoons hot sauce (like Frank’s)
- ¼ teaspoon salt
- 3 oz grated cheese (about 90 grams; I used a cheddar blend)
- 1 green onion (chopped)
- Olive oil spray
How to Make Cheesy Garlic Chicken Wraps
Step 1: Prepare the Filling
In a bowl, mix chopped chicken, garlic, mayonnaise, yogurt, hot sauce, and salt until well combined.
Step 2: Assemble the Wraps
Lay out your tortilla. On the lower third of the tortilla:
1. Sprinkle about 2 tablespoons of cheese.
2. Top with about ⅔ cup of the chicken mixture.
3. Add another tablespoon of cheese and sprinkle with green onion.
Step 3: Roll Up the Wraps
Fold in the sides of the tortilla and roll it up tightly from the bottom to secure all the fillings.
Step 4: Cook the Wraps
Heat a non-stick pan over medium-high heat and spray with olive oil. Place wraps seam-side down in the pan:
1. Cook for 3–4 minutes per side until crispy and golden.
2. Cover with a lid to help heat the inside thoroughly.
Step 5: Serve
Slice each wrap in half and serve immediately while warm! Enjoy your delicious Cheesy Garlic Chicken Wraps!
How to Serve Cheesy Garlic Chicken Wraps
Cheesy garlic chicken wraps are versatile and can be enjoyed in various ways. Whether you want a light meal or a hearty snack, these wraps can fit any occasion.
Pair with Fresh Salads
- Caesar Salad: A classic choice that adds crispness and a tangy dressing.
- Greek Salad: Adds a refreshing burst of flavor with cucumbers, tomatoes, and olives.
Add Dipping Sauces
- Ranch Dressing: Creamy and cool, it complements the garlicky flavors perfectly.
- Sriracha Mayo: For those who love a spicy kick, this sauce elevates the flavor profile.
Serve with Sides
- Sweet Potato Fries: Baked or air-fried, they offer a sweet contrast to the savory wraps.
- Steamed Vegetables: Broccoli or green beans add color and nutrition to your meal.
How to Perfect Cheesy Garlic Chicken Wraps
To make your cheesy garlic chicken wraps even better, consider these simple tips.
- Bold Flavoring: Use fresh garlic for a more intense flavor compared to powdered options.
- Optimal Cheese Blend: Try mixing different cheeses like mozzarella and pepper jack for extra creaminess and heat.
- Crispy Texture: Ensure the pan is hot before placing the wraps for that perfect golden crust.
- Wrap Tightly: Roll the tortillas tightly to prevent filling from spilling out during cooking.
- Experiment with Fillings: Add vegetables like bell peppers or spinach for added nutrition and texture.
Best Side Dishes for Cheesy Garlic Chicken Wraps
Complement your cheesy garlic chicken wraps with these delicious side dishes. They enhance the meal without overpowering it.
- Coleslaw: A crunchy mix of cabbage and carrots that adds freshness.
- Corn on the Cob: Sweet and juicy corn brings a delightful sweetness to balance savory flavors.
- Mixed Fruit Salad: A medley of seasonal fruits provides a refreshing contrast.
- Quinoa Salad: Nutritious and filling, it pairs well with the savory wraps.
- Chips and Salsa: Crunchy tortilla chips with zesty salsa make for a fun side option.
- Garlic Breadsticks: Enhance that garlic flavor with some buttery breadsticks on the side.
Common Mistakes to Avoid
It’s easy to make mistakes when preparing Cheesy Garlic Chicken Wraps. Here are some common pitfalls and how to steer clear of them.
- Bold ingredient measurements: Not measuring your ingredients accurately can lead to an imbalance in flavors. Always use a kitchen scale or measuring cups for precision.
- Bold overcooking the chicken: Cooking chicken too long can make it dry. Ensure your chicken is cooked just right before mixing with the other ingredients.
- Bold skipping the cheese layer: Forgetting to add cheese in between layers can result in less gooeyness. Always sprinkle cheese both under and on top of the filling for that cheesy goodness.
- Bold using low-quality tortillas: Cheap tortillas might tear easily or not hold up well when cooking. Opt for high-quality tortillas that can handle filling and frying well.
- Bold neglecting seasoning adjustments: Everyone’s taste is different. Taste your mixture before wrapping to adjust garlic, salt, or hot sauce as needed for your preference.
Refrigerator Storage
- Store Cheesy Garlic Chicken Wraps in an airtight container.
- They can be kept for up to 3 days in the refrigerator.
Freezing Cheesy Garlic Chicken Wraps
- Wrap each individual wrap tightly in plastic wrap or aluminum foil.
- Place them in a freezer-safe bag or container; they will last up to 2 months.
Reheating Cheesy Garlic Chicken Wraps
- Oven: Preheat to 350°F (175°C). Place wraps on a baking sheet and heat for about 10-15 minutes until warm and crispy.
- Microwave: Heat on medium power for about 1-2 minutes. Be mindful that they may become soft rather than crispy.
- Stovetop: Heat a non-stick pan over medium heat and cook each side for 2-3 minutes until warm and slightly crispy.
Frequently Asked Questions
What are Cheesy Garlic Chicken Wraps?
Cheesy Garlic Chicken Wraps are delicious wraps filled with tender chicken, garlic, cheese, and creamy sauce, all wrapped in a tortilla.
Can I customize my Cheesy Garlic Chicken Wraps?
Absolutely! You can add vegetables like bell peppers or spinach, switch cheeses, or use different sauces based on your preferences.
How do I make Cheesy Garlic Chicken Wraps healthier?
To make them healthier, use whole grain tortillas and add more veggies. You could also substitute lighter versions of mayonnaise or yogurt.
Can I use leftover chicken for this recipe?
Yes! Leftover cooked chicken works perfectly in these wraps, making it a great way to repurpose meals.
How long does it take to make Cheesy Garlic Chicken Wraps?
The total time for preparing these wraps is around 22 minutes, including both prep and cooking times.
Final Thoughts
Cheesy Garlic Chicken Wraps offer a delightful blend of flavors and textures that makes them a favorite meal option. They’re not only easy to prepare but also versatile, allowing you to customize based on what you have at home. Whether you’re looking for a quick lunch or a comforting dinner, give this recipe a try!
Cheesy Garlic Chicken Wraps

Cheesy Garlic Chicken Wraps are a delicious and satisfying option perfect for any meal. These wraps feature a crispy tortilla filled with tender chicken, creamy garlic sauce, and gooey cheese, making them irresistible. Whether you’re in need of a quick lunch or a hearty dinner, this recipe fits the bill with minimal prep time and customizable ingredients. With just 22 minutes from start to finish, you can enjoy this flavorful dish while ensuring it’s packed with protein and comfort.
- Prep Time: 10 minutes
- Cook Time: 12 minutes
- Total Time: 22 minutes
- Yield: Serves 2
- Category: Main
- Method: Frying
- Cuisine: American
Ingredients
- 2 large tortillas (regular or low-carb/high-protein)
- 7 oz cooked chicken (chopped)
- 2 garlic cloves (minced)
- 2 tablespoons light mayonnaise
- 1 tablespoon light Greek yogurt
- 2 teaspoons hot sauce
- ¼ teaspoon salt
- 3 oz grated cheese
- 1 green onion (chopped)
- Olive oil spray
Instructions
- In a mixing bowl, combine chopped chicken, minced garlic, mayonnaise, yogurt, hot sauce, and salt until well mixed.
- Lay one tortilla flat and sprinkle about 2 tablespoons of cheese on the lower third.
- Add approximately ⅔ cup of the chicken mixture on top of the cheese, then sprinkle another tablespoon of cheese and add green onions.
- Fold in the sides of the tortilla and roll it tightly from the bottom to secure all fillings.
- Heat a non-stick pan over medium-high heat with olive oil spray. Place wraps seam-side down in the pan and cook for about 3–4 minutes on each side until golden brown. Cover with a lid to ensure even heating inside.
- Slice each wrap in half and serve warm.
Nutrition
- Serving Size: 1 serving
- Calories: 410
- Sugar: 2g
- Sodium: 800mg
- Fat: 18g
- Saturated Fat: 8g
- Unsaturated Fat: 9g
- Trans Fat: 0g
- Carbohydrates: 36g
- Fiber: 3g
- Protein: 38g
- Cholesterol: 90mg